
People love to take photos of every important moment, such as weddings, family days, graduations, friend gatherings, etc. With the latest iPhone (iPhone 14 Pro Max/14 Pro/14), the photos and videos were taken by its camera to keep a wonderful time on your iPhone and you won’t want to lose them at any time. Time by time, you may find that the photos have taken up too much space in your iPhone, or you will be afraid of losing the photos unexpectedly.
You May Need: How to Free up More Space on Mac
In this case, you should transfer your photos from your iPhone to Mac to back up your iPhone photos. Here we will introduce 4 ways to transfer photos from iPhone to Mac. You must be able to find the best way for you.
Contents
How to Transfer Photos from iPhone to Mac using Photos/iPhoto App
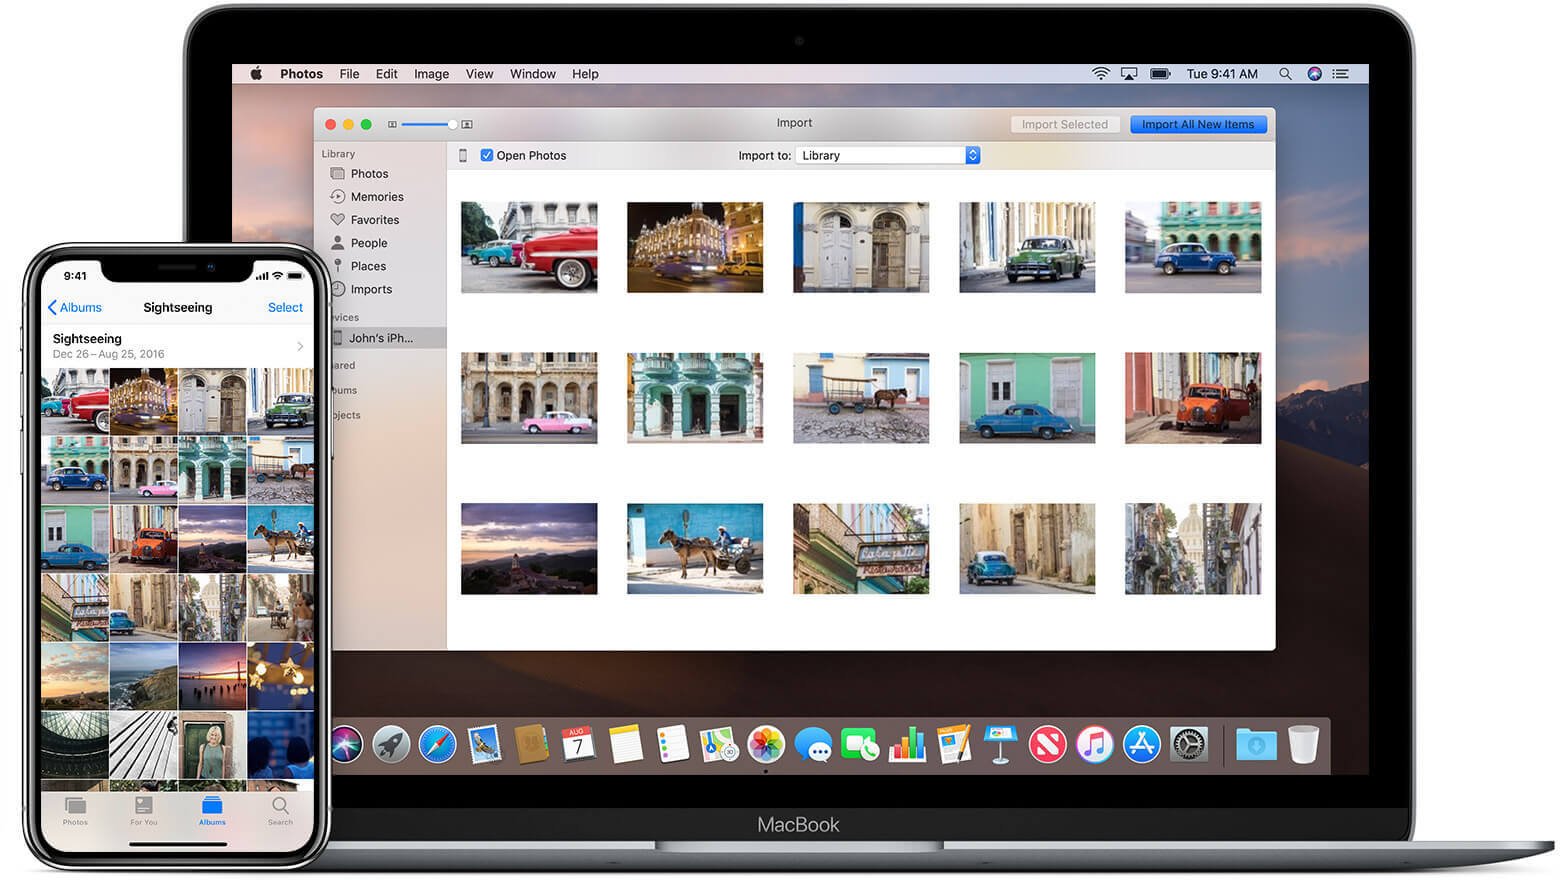
For photos taken by iPhone, iPad, or iPod touch, using the Photos app to transfer photos directly to Mac is a convenient way.
Step 1. Connect your iPhone to your Mac
After you connect your iPhone to your Mac, the Photos app usually will be launched automatically. If not, you can launch the Photos app on the Launchpad.
Step 2. Import your Photos to Mac
Click “Import” on the top in Photos, and then select the photos you want to transfer. After you have selected all the photos, you can click the “Import Selected” or “Import All New Photos” option to transfer the photos to your Mac.

Note: The Photos app is updated by iPhoto if your macOS is Mac OS X Yosemite or later. If your Mac runs on Mac OS X Yosemite’s earlier version, you can do this using iPhoto with similar steps.
How to Transfer Photos from iPhone to Mac using iCloud Photo Library
If you want to sync your photos taken with your iPhone camera, you can try this way if you have enabled iCloud on your iPhone. You can follow the steps below.
- Open the Setting on your iPhone.
- Click your Apple ID and enter your iCloud.
- Enter the Photos in the Apps Using the iCloud list. Then turn on the iCloud Photo Library (iCloud Photos above iOS 12).

After you have enabled the iCloud Photo Library, you should do the same settings on your Mac. First, click the Apple icon in the top left corner. Then go to System Preferences > iCloud. After you sign in to the iCloud account with the same Apple ID, you’ll see the uploaded photos from your iPhone in the appropriate sections.

Note: As you have enabled the iCloud Photo Library, you should be aware that any changes (new-added, deletion, or duplicate) on one of your Apple devices will sync to the other one automatically. If you don’t want to auto-synchronize, you should turn off it.
How to Transfer Photos from iPhone to Mac with AirDrop
AirDrop is another powerful tool for iOS and macOS, which allows you to transfer files between iOS and macOS. You surely can transfer photos from iPhone to Mac using AirDrop.
Step 1. Enable the AirDrop on your Mac.
Step 2. Open your Photos app on your iPhone.
Step 3. Click the “Select” button on the right top corner to select the photos you want to transfer.
Step 4. After you have chosen the photos, tap the “Share” button at the bottom.
Step 5. Choose the name of your Mac in the AirDrop Share section if your Mac is detected via AirDrop.
Step 6. Accept the transferred photos on your Mac. After transferring, you can check the photos in the Downloads folder.

How to Transfer Photos from iPhone to Mac via iPhone Transfer
The best way to copy photos from iPhone to Mac is by using MacDeed iOS Transfer. It can help you easily transfer photos to Mac, as well as music, videos, contacts, text messages, apps, etc. Moreover, it can do more than these. Just have a free try!
Step 1. Download & Install iOS Transfer
Download MacDeed iOS Transfer on your Mac, and then install it.

Step 2. Connect Your iPhone to Mac
Connect your iPhone (including iPad and iPod) to your Mac via a USB cable. Then click “Manage” to choose the photos you want to export.

Step 3. Export iPhone Photos
Click “Photos” on the left bar and select the photos you want to transfer. And then click “Export” to transfer the photos from your iPhone to your Mac.

After a few seconds, the photos in your iPhone have been transferred to your local folder and you can have a view of them whenever you want.
If you want to transfer all photos from iPhone to Mac, you can also choose “One-click to Export Photos to PC” after you launch MacDeed iOS Transfer. It will save time.

Besides, MacDeed iOS Transfer is powerful that you can convert your iPhone photos from Heic to JPG, backup your iPhone in a very easy way, and sync all data between your iPhone and Mac. It is well compatible with MacBook Pro/Air, iMac, and Mac.