

You may have upgraded your Mac from Monterey to Ventura beta, or from Big Sur to Monterey, or finally decide to update from a previous version (such as Mojave, or High Sierra) to Catalina, looking forward to experiencing new awesome features and increased performance.
However, unexpected errors may occur after Ventura, Monterey, Big Sur, Catalina, or other versions update, the commonest one is that your photos in the Photos app are lost/disappeared from your Mac, or photos missing because the originals cannot be found on your Mac. Don’t panic, we have 6 solutions for you to recover lost/disappeared/missing Mac photos and photo albums.
Contents
Why Have Photos Disappeared from Mac and Where Did They Go?
There are many reasons that lead to disappeared photos on Mac, but it is hard to determine what is exactly the reason causes such an error unless we test and exclude them one by one. Anyway, the following are probably the reasons why your photos get disappeared from your Mac:
- Mac crashes when updating to the latest macOS
- macOS conflicts with apps on your Mac and causes data loss
- Not enough space for macOS updates and data is overwritten
- Accidentally delete the photos or someone else mistakenly delete
- You have set up the iCloud Photo sync across different devices, but the iCloud Photo Library is disabled on your Mac, so the photos don’t sync up and missing
Therefore, as first aid to find or recover lost photos after a mac update, you can enable iCloud sync, go to the Trash bin, scan and remove malware, and delete unwanted files to get more space. Or just search your pictures folder to make sure your photos are still there on your Mac: click on Apple Menu>Go>Go to Folder>Input “~/Pictures/”>Go, check the Pictures folder or other folders you may use to save photos on your mac.

All Photos Disappeared from Mac after Update? Here’s the Quick Fix!
The fastest and most straightforward way to recover lost or disappeared photos on Mac after the update is using a piece of data recovery tool, it saves your time and even brings some valuable data back to your MacBook Pro or Air. MacDeed Data Recovery— the best method for recovering lost images, videos, songs, etc. from both the internal Mac hard drive and external storage devices. It supports an extensive number of formats and drives types. If your pictures missing after upgrading to Ventura, Monterey, Big Sur, or Catalina in the absence of a time machine backup, you can recover them using this software.
Why MacDeed Data Recovery?
- Restore files lost due to deletion, formatting, system crash, power off
- Recover data from both internal and external hard drives
- Restore 200+ file formats: video, audio, image, document, etc.
- Quickly search files with keyword, file size, date created or modified
- Preview files before recovery
- Recover files to a local drive or Cloud (Dropbox, OneDrive, GoogleDrive, iCloud, Box)
- Quick access to Trash, Desktop, Downloads, etc
- Save the scan result for the next scanning
- Show all/lost/hidden files
- High recovery rate
Easy Steps to Recover Lost or Disappeared Photos on Mac After OS Update
Step 1. Install the program.
Download and install the free trial of MacDeed Photo Recovery on your Mac, and then run it.
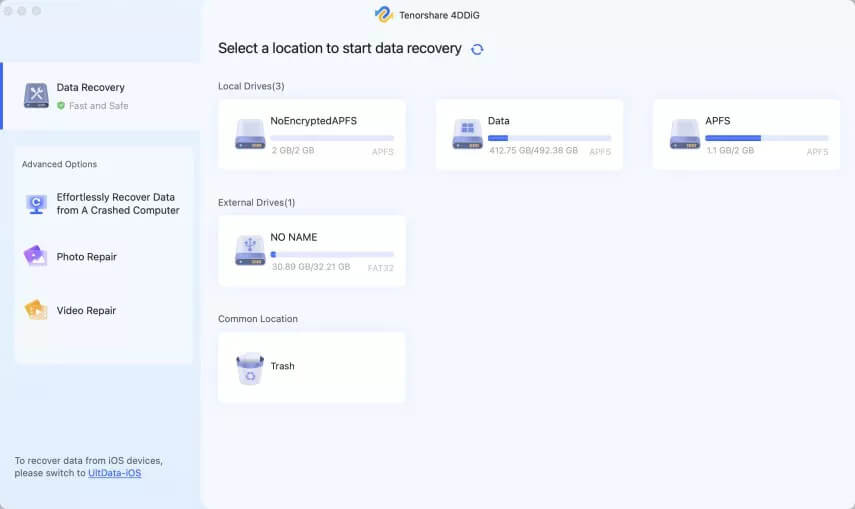
Step 2. Choose the location for lost or disappeared photos.
Go to Disk Data Recovery, and choose the location where stored the lost photos are on your Mac.
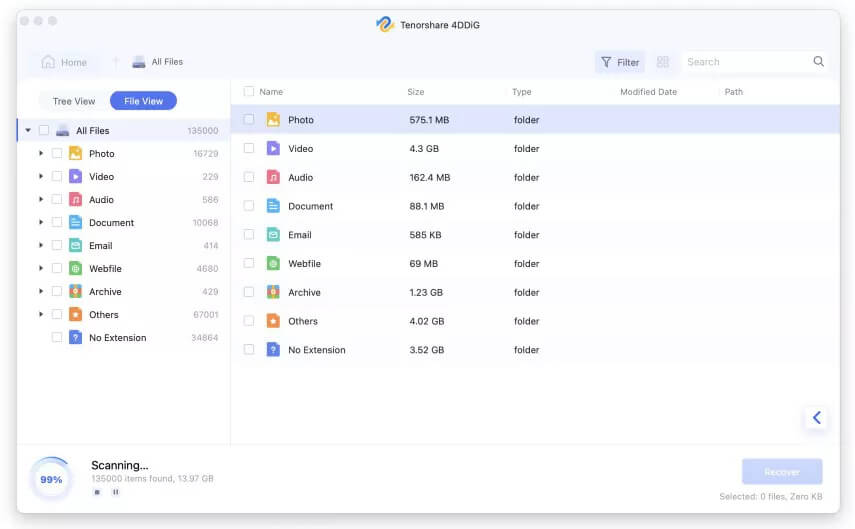
Step 3. Scan and find the disappeared or lost photos.
Click the Scan button to start scanning the hard drive, go to All Files > Photo, and check the photos of different formats.
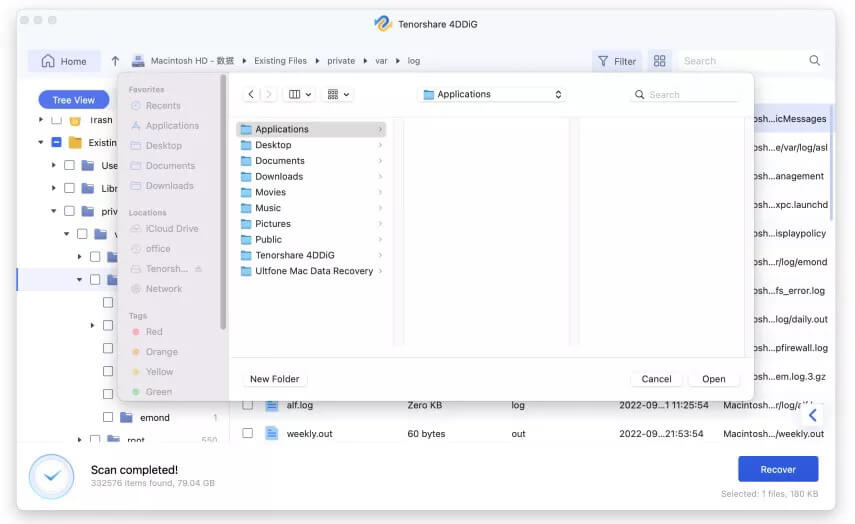
Step 4. Preview and Recover disappeared photos on Mac.
Double-click on the photos to preview, select the photos, and click on Recover to get them back.
With this, the procedure to recover disappeared images after upgrading to the new macOS is completed successfully.
How to Restore Photo Library on Mac to Get Back Disappeared Photos
The photo library is the database where all photo files, thumbnails, metadata info, etc. are stored. It may get corrupted if you find the library folder but see no photos in it. But luckily, the Photos app allows users to Repair their photo library when photos or photo albums are lost/disappeared for no reason, become unreadable, or just missing.
Before doing Library First Aid, it’s always a good idea to back up your hard drive first with either Time Machine or another method; You may need to wait a few minutes or several hours for the Photos to fix. In my case, while doing Library First Aid I can still use my Mac though it is a little sluggish during the process.
- Quit the Photos app if it’s launched.
- Press the keys- Option and Command while you re-open Photos.
- In the pop-up Repair Library dialog, click “Repair” to recover lost photos on mac after the update. (Account and password may be needed for authorizing the Library Repair.)

- Wait for the Repair process to finish, then your photo library will be opened automatically and now you can check your photos.

The process might stop syncing photos with iCloud. So it’d be better to check it by navigating to Photos > Preferences > iCloud once the process is finished.
Photos Missing from Photo Library? Find Original!
Sometimes, we don’t get the correct setting for our Photos app, like we leave “Copy items to the Photo library” unchecked, so when we view our photos in Photos but later move the photos to an external hard drive after the Mac update, once we want to check the photos again, they became “missing” on your Mac since the original ones are not found. In this case, we need to restore these missing photos by Consolidate.
- Launch the Photos app, go to Preferences>General, and check the box before “Copy items to the Photos library”.

- Click on one of the “missing” photos, and continue with Find Original.

- Then navigate to the drive or folder where you stored the original photos.
- Then select all these original photos, and go to File > Consolidate, now all the photos won’t be referenced and saved in an external hard drive, they are moved to your photo library.

3 Free Ways to Recover Lost Photos after Mac Update
If there is no issue with your photo library and you just want to try other methods before installing MacDeed Data Recovery on your Mac, here are 3 free options to fix lost photos from your Mac after the update.
How to Recover Lost Photos after Mac Update from Recently Deleted
If your Mac photos albums disappeared after macOS Ventura or Monterey update, have a look at the “Recently Deleted” album in the Photos app.
- Open the Photos app.
- Click the “Recently Deleted” tab from the left side.
- Choose the thumbnails of your lost photos.
- Click on the “Recover” button in the upper-right corner to restore missing files after the Mac update.

Matters that need attention:
- The photo items in the “Recently Deleted” album only give you a 30-day grace period before getting rid of them to the ground.
- Enable iCloud and get your photos backed up on iCloud as well.
How to Restore Photos after Mac Update with Time Machine
Still not able to recover the Photo library after the Mac update, now take a crack at Time Machine restore, if you have enabled and set up the Time Machine backup.

How to Recover Lost Photos on Mac after Update with Time Machine
- If the Photos is open, choose Photos > Quit Photos.
- Click the Apple menu > choose System Preferences and > click on Time Machine.
- In the Time Machine menu, select Enter Time Machine, and it will take you to Time Machine on Mac.
- Time Machine will show you all available backups. Click the date of your last backup and select the lost photos that you want to restore you can also press the space bar to preview the photo.

- Click the Restore button and the image file will be restored to the original location on Mac. Depending on the size of your file, it may take some time for your library to be restored.
How to Restore Lost Photos on Mac with iCloud Backup
Still, using the iPhoto app on your Mac and working on an earlier macOS? Even if your iPhoto library gets disappeared after the mac update, we can still restore it.
In the case that you don’t have a Time Machine backup but enabled iCloud backup, go check your iCloud account and find if the photos are still up there in the cloud because there is a chance that you’ve disabled the iCloud update on Mac before the photos went lost from Mac. If it is a positive answer, download the photos from your iCloud to your Mac again for recovery.
- Visit iCloud.com in your browser, and login in.
- Go to Library > Photos, and select the photos that you want to recover to your Mac.
- Then click on the Download icon and find the photos in the Downloads folder.

Conclusion
Our Mac may store years or months of photos, they are valuable and we can’t afford to lose them. But chances are that they can be deleted or missing during the process of Mac upgrading. So, It is necessary to back up the entire Mac drive before upgrading to new Ventura, Monterey, or other versions. You can back up them to multiple devices or use cloud services such as Google Drive, Dropbox, etc.
MacDeed Data Recovery: Recover Lost, Disappeared, Missing Photos on Mac Fast
- Restore lost, disappeared, missing and formatted photos caused by updates, downgrades, etc.
- Recover 200+ types of files: photo, video, audio, document, archive, etc.
- Apply both quick and deep scans to find the most files
- Search and locate lost files quickly with filter tools
- Preview photos, videos, Word, Excel, PowerPoint, PDF, and other files
- Recover files from specific folder
- Fast scanning and recovering
- Recover files to a local drive, external storage device, and Cloud platforms
Once data loss occurs, just stay calm, and follow the methods above to recover lost or disappeared photos on Mac after the update. The most helpful and all-in-one solution is installing a Mac photo recovery software or service.