

If you have installed Ventura, Monterey, Big Sur, Catalina, Mojave, or earlier versions, you may have to reinstall macOS for the following reasons:
- Your System Keeps Crashing or Works Improperly
When you continuously see error messages appear on your mac, or your programs randomly crash/freeze for no reason, like FaceTime won’t work, Contacts or Calendar shows a delay or mess, blue teeth or WiFi won’t connect…Then, you have a good reason to reinstall macOS.
- Reinstall When There is a New macOS Version Available
Apple keeps working constantly to fix bugs, make performance tweaks, add new features or enhance coding. Therefore, doubtless, there will be new versions of macOS available to upgrade and reinstall.
- Your Mac is Running Slow
As we all know, for no specific reason, system reinstallation can magically solve a slow Mac in most cases.
- You are Going to Sell the Mac
In the case that you want to sell your mac, besides erasing all your personal data and traces on the mac, you will need to reinstall macOS as well.
It is not complicated to reinstall macOS Ventura, Monterey, Big Sur, or Catalina, but if you want to reinstall macOS without losing data, there are 3 steps you must follow.
Contents
3 Steps to Reinstall macOS Ventura, Monterey or Big Sur without Losing Data
We all save tons of data on our Mac, so when we decide to reinstall macOS Ventura, Monterey/Big Sur/Catalina, the top concern always goes to “will I lose everything if I reinstall macOS”. In fact, reinstallation of macOS doesn’t necessarily cause lost data, it just creates a new copy, and your existing files and data saved in programs won’t be altered or deleted. But just in case of bad luck, we need to do some work on BACKUP, this is crucial for macOS reinstallation without losing data.
Step 1. Prepare Your Mac for Reinstallation.
- Make enough room for Ventura, Monterey, Big Sur, or Catalina reinstallation, at least 35GB, so the reinstallation process won’t pause or stopped for insufficient space.
- Also, quit all apps or programs under work, so your Mac is fully geared to reinstall.
- Check drive conditions. Open Disk Utility and perform the Frist Aid on your hard drive where to reinstall the macOS to make sure your drive is in good condition for reinstallation.
- If you are reinstalling macOS on a Macbook, make sure the battery percentage is more than 80%.
Step 2. Backup All Your Files for macOS Install (Crucial)
Backup is an indispensable step involved in macOS reinstallation, here are several options to backup your data.
Option One: Using Time Machine
- Connect an external drive to Mac for backup.
- Go to Finder> Application, launch Time Machine, and choose “Set Up Time Machine”.

- Click “Select Backup Disk” to choose an external hard drive to back up the files.

- Then Check the box before “Back Up Automatically”. Also, you can adjust the backup setting in the menu “Options”.
If this is the first time you use Time Machine to backup, wait patiently for Time Machine to complete the backup, it will prompt the notification once finishes.

Option Two: Using Hard Drive
- Connect your hard drive to your Mac.
- Open Finder to check if your hard drive is present under “Devices”.
- Create a new folder, copy and paste or directly move the items you want to save from Mac to this folder.
- Finally, eject your hard drive.
Option Three: Using iCloud Service (Backup Desk and Documents Folders)
- Go to Finder> System Preference, and click on “iCloud” to bring up its main interface.

- Click the “Options” button for “iCloud”, and check the box before “Desktop and Documents Folders”, then click on “Done”.

Most of our mac users prefer to back up all files but apps. So, to save you from the troubles of lost data due to macOS reinstallation, you are recommended to keep records of what apps you have installed, the account, and the password, also, you can take screenshots of the settings.
Step 3. Reinstall macOS Ventura, Monterey, Big Sur, or Catalina without Losing Data.
Option 1: Reinstall macOS without Losing Data From Internet Recovery
(Notes: If your Mac is ON, click on the Apple icon, and go to Restart to turn off the Mac first.)
- Turn on your Mac and go to Options.
For Apple Silicon: Press and hold the Power button until you see the startup options window.
For Intel Processor: Press the Power button and immediately press & hold Command Command (⌘)-R until you see the Apple logo. - Then choose “Reinstall macOS Monterey” or “Reinstall macOS Monterey” from the options window and click “Continue”.

- Select your hard drive, click “Install” and wait for the end of reinstallation.
Option 2: Reinstall macOS without Losing Data From USB
- Download the macOS Ventura, Monterey, Big Sur, or Catalina installer using Safari or other web browsers onto your Mac.
- Then connect the USB flash drive to your Mac.
- Open the Disk Utility program on your Mac, choose the USB flash drive, and click Erase to have a clean drive for reinstallation.

- Open Terminal, copy and paste sudo /Applications/Install macOS 13 Beta.app/Contents/Resources/createinstallmedia –volume /Volumes/MyVolume
For Monterey reinstallation: sudo /Applications/Install macOS Monterey.app/Contents/Resources/createinstallmedia
For Big Sur reinstallation: sudo /Applications/Install macOS Big Sur.app/Contents/Resources/createinstallmedia
For Catalina reinstallation: sudo /Applications/Install macOS Catalina.app/Contents/Resources/createinstallmedia

- Then add the volume of the USB flash drive: –volume /Volumes/MyVolume, replace MyVolume with your USB flash drive name, mine is Untitled.

- Press Enter, input the password and wait for the process to finish.

- Quit the Terminal and eject the USB.
- Plug the USB bootable installer into your Mac, and make sure the Mac is connected to the internet.
- Press and hold the Option (Alt) key immediately after restarting the Mac, and release the Option key when the screen shows your bootable volumes.
- Select the USB volume and press Return.
- Choose Install macOS Ventura, Monterey, Big Sur, or Catalina, and click Continue to finish mac reinstallation from USB.
tips: If you are using an Apple Silicon Mac, from step 9, you should press and hold the Power button until you see the startup options and follow the instruction to finish the macOS reinstallation.
What if You Lost Data After macOS Ventura, Monterey, and Big Sur Reinstallation?
However, losing data after reinstallation still happens. It may result from an interrupted installation (power-off/poor internet connection), corrupt setup, insufficient space, or improper actions. Then, what to do if you lost data after reinstallation? Here are 2 methods.
Method 1: Use MacDeed Data Recovery to Recover Data
In case you didn’t do a backup before reinstallation, you will need a dedicated data recovery program to find the lost data for you.
Here we recommend MacDeed Data Recovery, a powerful mac program allowing users to recover lost/deleted/corrupted/formatted files from a wide range of external or internal storage devices, no matter whether the file is lost due to human errors, power-off, reinstallation, upgrade, virus attack or disk crash.
Main Features of MacDeed Data Recovery
- Recover files lost due to OS reinstallation, upgrade, downgrade
- Recover deleted, formatted, and lost files
- Restore files from internal and external hard drives, USBs, SD cards, flash drives, etc.
- Restore videos, audio, images, documents, archives, and 200+ types
- Apply both quick and deep scan
- Preview files before recovery
- Fast scanning and recovery
- Recover files to a local drive or cloud platforms
Steps to Recover Lost Data after MacOS Reinstallation
Step 1. Download and install MacDeed Data Recovery on Mac.
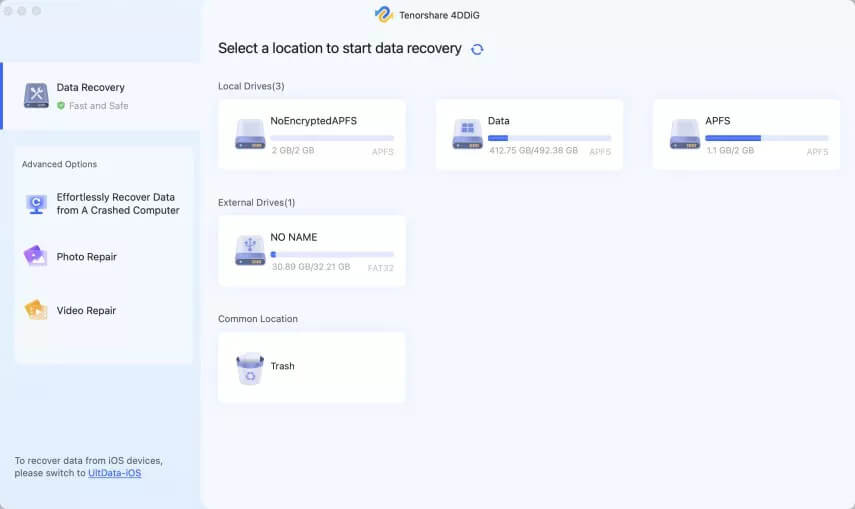
Step 2. Choose the Mac drive. Go to Disk Data Recovery and select the Mac drive that stored your data.
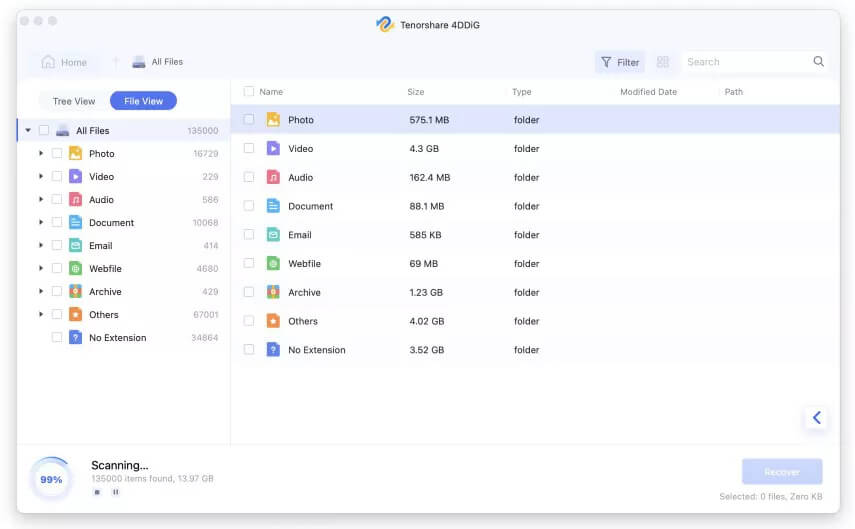
Step 3. Click “Scan”. Go to the path or type to check the found files. You can also use the filter tool to quickly search specific files.
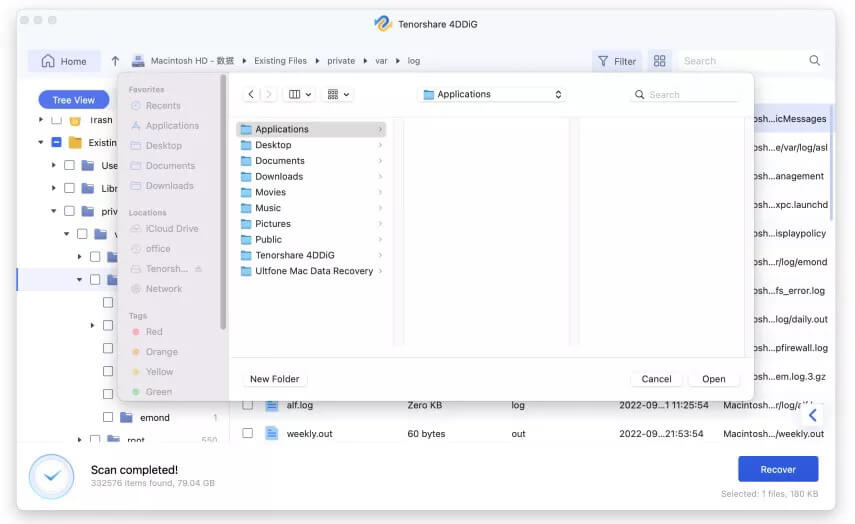
Step 4. Preview files found by MacDeed Data Recovery. Then click the Recover button to restore the lost data.
Method 2: Use Time Machine to Recover Data with Backup
If you have backed up your files on your mac, you can use Time Machine to restore the lost data.
Step 1. Go to Finder> Applications> Time Machine, launch it and choose “Enter Time Machine”.
Step 2. In the popped-up window, use the arrows and timeline to browse the local snapshots and backups.

Step 3. Find the deleted files, then click “Restore” to recover the lost data caused by reinstallation.
macOS Ventura, Monterey, Big Sur Reinstallation Not Working?
If you have taken all necessary preparations and followed exactly every step listed above but still failed to reinstall macOS Ventura, Monterey, Big Sur, or Catalina on your Mac, we will walk you through several solutions in this part to fix Reinstallation Not Working.
- Check your internet connection and make sure it is stable.
- Use Disk Utility to repair the startup disk first. Go to Applications> Disk Utility> Choose Startup drive> First Aid to repair it.
- Do the reinstallation again and make sure you’ve followed each step without error.
- If the above solutions won’t work and you insist on installing Monterey on your Mac, go erase your Mac first, then reinstall macOS by following the above steps. But make a backup before erasing.
- Downgrade to Monterey, Big Sur, Catalina, or earlier versions if no other solution work on your Mac.
Conclusion
The key to reinstalling mac OS Ventura, Monterey, Big Sur, Catalina, or Mojave without losing data is the backup since no one can guarantee all data will be perfectly maintained after macOS reinstallation. However, if we, unfortunately, lost files after macOS reinstallation, Time Machine or MacDeed Data Recovery is helpful to recover them back.
Recover Files after macOS Reinstall – MacDeed Data Recovery
- Recover data lost due to macOS reinstallation, upgrade, downgrade
- Recover data lost due to accident deletion, formatting, etc.
- Restore data from both internal and external storage devices: Mac hard drive, SSD, USB, SD Card, etc.
- Recover videos, audio, images, documents, and other 200+ files
- Preview files (video, photo, PDF, word, excel, PowerPoint, keynote, pages, numbers, etc.)
- Quickly search files with the filter tool
- Recover files to a local drive or cloud (Dropbox, OneDrive, GoogleDrive, pCloud, Box)
- High recovery rate
So, do you have any other tips to reinstall macOS without losing data? Please share with more of our mac users.