

When you delete any unwanted files from your Mac hard drive, they will be moved to the Trash bin and still take up some space on your Mac. To permanently delete these unwanted files, we can empty the Trash bin. But you may get error messages that Mac Trash won’t empty for known or unknown reasons. Here we listed some of the solutions that may help you fix “Can’t empty Trash mac”.
Contents
General Solutions for Mac Trash Won’t Empty
For a known or unknown reason causing Mac Trash won’t empty, there are 2 general solutions to fix this problem, redo Empty Trash or restart the mac.
Redo Empty Trash
Trash may stop working and freeze for a variety of internal and external factors, but quitting Trash and redoing Empty Trash can be an easy solution for this issue sometimes. We just quit the app and get it back to default settings for a new task.
- Close the Trash bin if it is still open.
- Then right-click on the Trash bin icon and select Empty Trash.

- Confirm to Empty Trash and check if your Trash can be emptied on Mac.
Restart Mac
When restarting Mac, this process will empty active RAM and start everything from scratch to clear faults. Your Mac will become clean and fast, as good as new. Mac Trash won’t empty error may be cleared by restarting the Mac.
- Quit all running apps.
- Click on the Apple menu and select Restart.

- Then Empty the Trash again to check if the problem is fixed.
How to Fix Mac Trash Won’t Empty File in Use, Lock, Disk Full, etc.
Fix Mac Trash Won’t Empty File in Use
If you can’t remove files from the Trash bin and you get an error about “File in Use”, then your file is used by another app or involved in a background process. You should try to close the app that is using the file. You can also quit all the running apps to make sure that the file is no more being used by any of the apps. Then try to empty Trash on Mac again.

Fix Mac Trash Won’t Empty File Under Lock
When you try to remove a file, but unfortunately you failed and it said: “The operation could not be completed because the item ‘(item name)’ is locked”. If files are locked, you should unlock them before deleting them.
- In the Trash bin, find the locked file with a lock icon.

- Right-click on the file and choose Get Info.

- Then uncheck the box before Lock.

- Then click Empty to empty trash on Mac.
Fix Mac Trash Won’t Empty File without Permissions
When emptying Trash on Mac, some files may be read-only or not allowed to access and thus stop the trash empty process. In this case, you need to check each file to make sure all the files are accessible and writable, otherwise, you need to change the file’s permissions for removal.
- Right-click on a file in your Trash bin and select Get Info.
- You’ll see “Sharing & Permissions”, select the arrow to drop down the options, click your current user name to check the file permissions, and then adjust the permissions option to “Read & Write”.

Fix Mac Trash Won’t Empty Because Disk is Full
If you receive an error message “The operation can’t be completed because the disk is full.”, instead of backing up, wiping, and reinstalling, you are recommended to boot your Mac in Safe Mode and empty Trash again.
macOS safe mode is used to diagnose and troubleshoot problems when your Mac doesn’t work properly. Also, it loads required kernel extensions only, prevents Startup items and Login items from opening automatically, and deletes the system and other cache files, which helps speed up your Mac and free some space. That’s why the Safe Mode might fix Mac Trash Won’t Empty when your disk is full.
Boot in Safe Mode on Intel Macs
- The press Power button and then presses and holds down the Shift key while it starts.
- Once the Login window shows, release Shift and log in.
- Now, you can empty the Trash again.
Boot in Safe Mode on Apple Silicon Macs
- Press and hold the Power button until you see the startup options.
- Choose startup disk.
- Press and hold the Shift key and choose to Continue in Safe Mode, release the Shift key.
- Then empty your Trash bin again.

Fix Mac Trash Won’t Empty Time Machine Backups
Mac Trash won’t empty time machine backups and receive the message “some items in the Trash cannot be deleted because of System Integrity Protection” sometimes, in this case, you will need to temporarily disable the System Integrity Protection.
- Start or restart your Mac, while holding Command+R to boot in Recovery Mode.
- Release the keys when the Apple logo appears and log in.
- Choose Utilities>Terminal and enter the command “csrutil disable; reboot”.
- Hit Return and wait for the restart.
- The SIP is temporarily disabled, now you can empty time machine backups in the trash bin.
- Then restart your Mac in Recovery mode again and follow the aforementioned steps to enter the command “csrutil enable; reboot” in Terminal to enable SIP again.
Fix Mac Trash Take Forever to Empty
If it takes forever to empty your Trash on Mac, this may be caused by large data to delete, out-of-date macOS, or malware.
If you have several GBs of data to be emptied from your Trash, you should force quit the deleting process and do the deletion several times, instead of emptying once and for all, just select a part of them and permanently delete them by batches.
If the files in your Trash bin are not large in capacity, you should check if your macOS is up to date. An older version of macOS will slow down your Mac and impact its performance.
If you have installed an antivirus program, launch it and run a scan on your Mac to check if a virus is hurting your Mac.
Ultimate Solution: Force Empty Trash on Mac
There are many third-party utility apps that can forcibly empty the Trash folder, but I don’t personally recommend any one of them here, because they ultimately use Terminal commands to delete Trash files, and we can do it manually. Using Terminal to empty Trash is the ultimate solution you should take, only if all of the above have failed. As these commands will delete locked files without alerting you of anything. Be extra cautious when doing this, or make a backup of your Mac files before deleting them if needed.
- Open Terminal on your Mac by going to Applications > Utilities > Terminal.
- Now type “
cd ~/.Trash” and hit the “Return” key.

- Now type “
sudo rm –R” followed by space. Leaving a space is mandatory, and don’t hit the “Return” button here.

- Then open the Trash folder from the Dock. Select all the files from the Trash folder, drag and drop them into the Terminal window. This step will add the path of each file to the “Remove” command we entered above.

- Now you can hit the “Return” button and then enter your administrator password to force empty trash on Mac.

This ultimate solution will delete files permanently from Trash beyond recovery, which means the files once deleted will not be recovered.
What If Trash is Emptied Mistakenly? Restore!
Mistakenly emptied all files in your Trash and want to restore some of them? It is much easier than you think because there are Mac data recovery programs available to get them back, such as MacDeed Data Recovery.
MacDeed Data Recovery is a Mac program designed to recover files lost due to different reasons, including but not limited to emptied trash, permanent deletion, formatting, power off, and virus. It cannot only restores files from Mac’s internal hard drive but also recovers data from external storage devices, including HDD, SD Card, USB Flash drive, etc.
MacDeed Data Recovery for Mac
- Both quick scanning and deep scanning are applied to recover files lost under different situations
- Recover files from both internal and external storage devices
- Restore 200+ types of files: video, music, image, doc, archive, etc.
- Scan fast and can be resumed later
- Preview recoverable files to restore wanted files only
- Batch select recoverable data with one click
- Very easy to use
How to Restore Emptied Trash Files on Mac?
Step 1. Download and install MacDeed Data Recovery on your Mac.
Step 2. Open the program and go to Data Recovery.
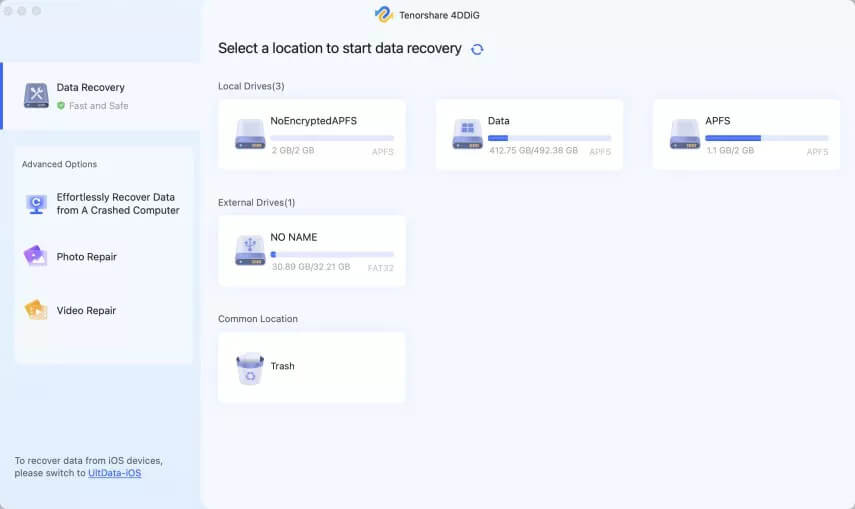
Step 3. Then select the drive where you want to recover emptied trash files. Click the “Scan” to start scanning deleted files in your Trash.
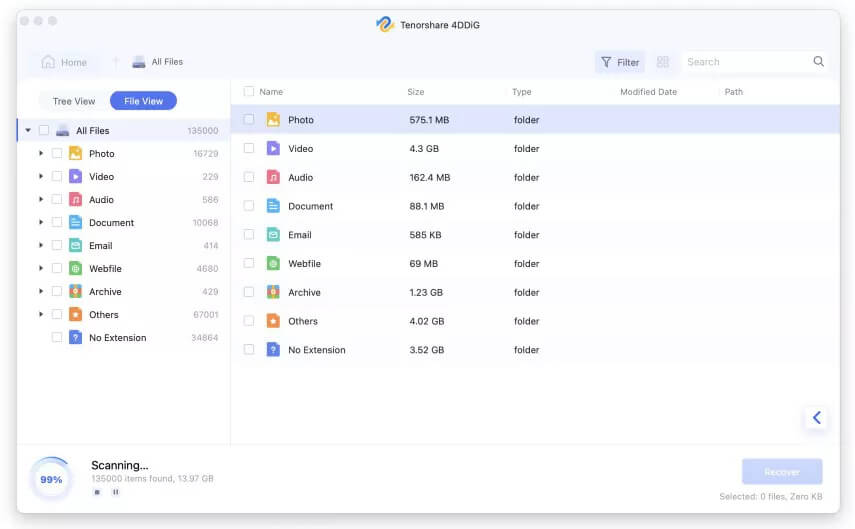
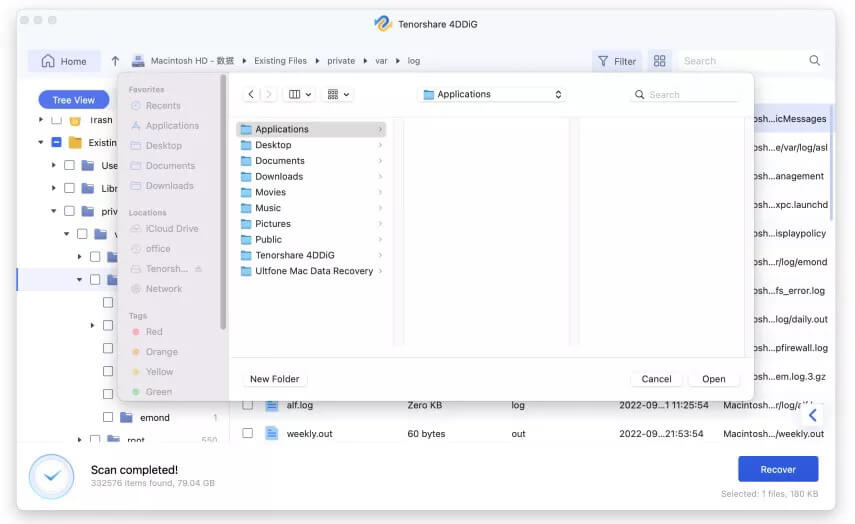
Step 4. Preview the files you want to recover and select them by checking the box.
Step 5. Click Recover to get emptied trash files back to your Mac.
Conclusion
For known or unknown reasons causing Mac Trash Won’t Empty, forcing empty trash is always the ultimate solution to fix it. But to avoid such trouble, we should always keep our macOS updated to date, back up, and clean up it on a regular basis to make sure it is always under a good status to run any task fluidly.
Recover Files from Emptied Trash Bin
- Recover files from various internal/external hard drives on mac
- Restore 200+ types of files: video, audio, image, documents, etc.
- Retrieve files lost due to formatting, deletion, system update, etc.
- Use both quick scanning and deep scanning mode to recover files for different data loss situations
- Quickly search files with the filter tool
- Preview files before recovery
- High recovery rate
- Recover files to a local drive or cloud platform