
Ordinarily, using iTunes makes it easier to do a backup locally on a controllable machine. Although these backups are really good and can definitely come in handy but then, they occupy just too much space on your Mac, especially if there are too many backups. However, the good thing is that you can get to delete excess backup early with iTunes. You can easily discard unwanted iOS software updates after usage and thus, free up more space on your Mac.
Defaulted, iTunes will take a backup of iPad, iPod, or iPhone immediately when you synchronize either of the iOS devices to your Mac. You can either manually initiate every one of these backups in iTunes when running an upgrade on your iOS device or make a restore. In this way, you can keep a secure copy of every one of your iPhone’s data easily. However, as the iDevice storage capacities continue to increase, the same also applies to the size of the backup. It means that if you have multiple device synchronizations on your Mac, this might be stored in big chunks of gigabytes of space. And since you need enough space for more files that you’d be taking into your iOS device, you need to free up some of the spaces that these synchronizations have swallowed up. In this article, we’ll be revealing to you how to view and delete iPhone/iPad backup from iTunes on your Mac to free up enough storage space.
Contents
How to Delete iPhone Backups from iTunes on Mac
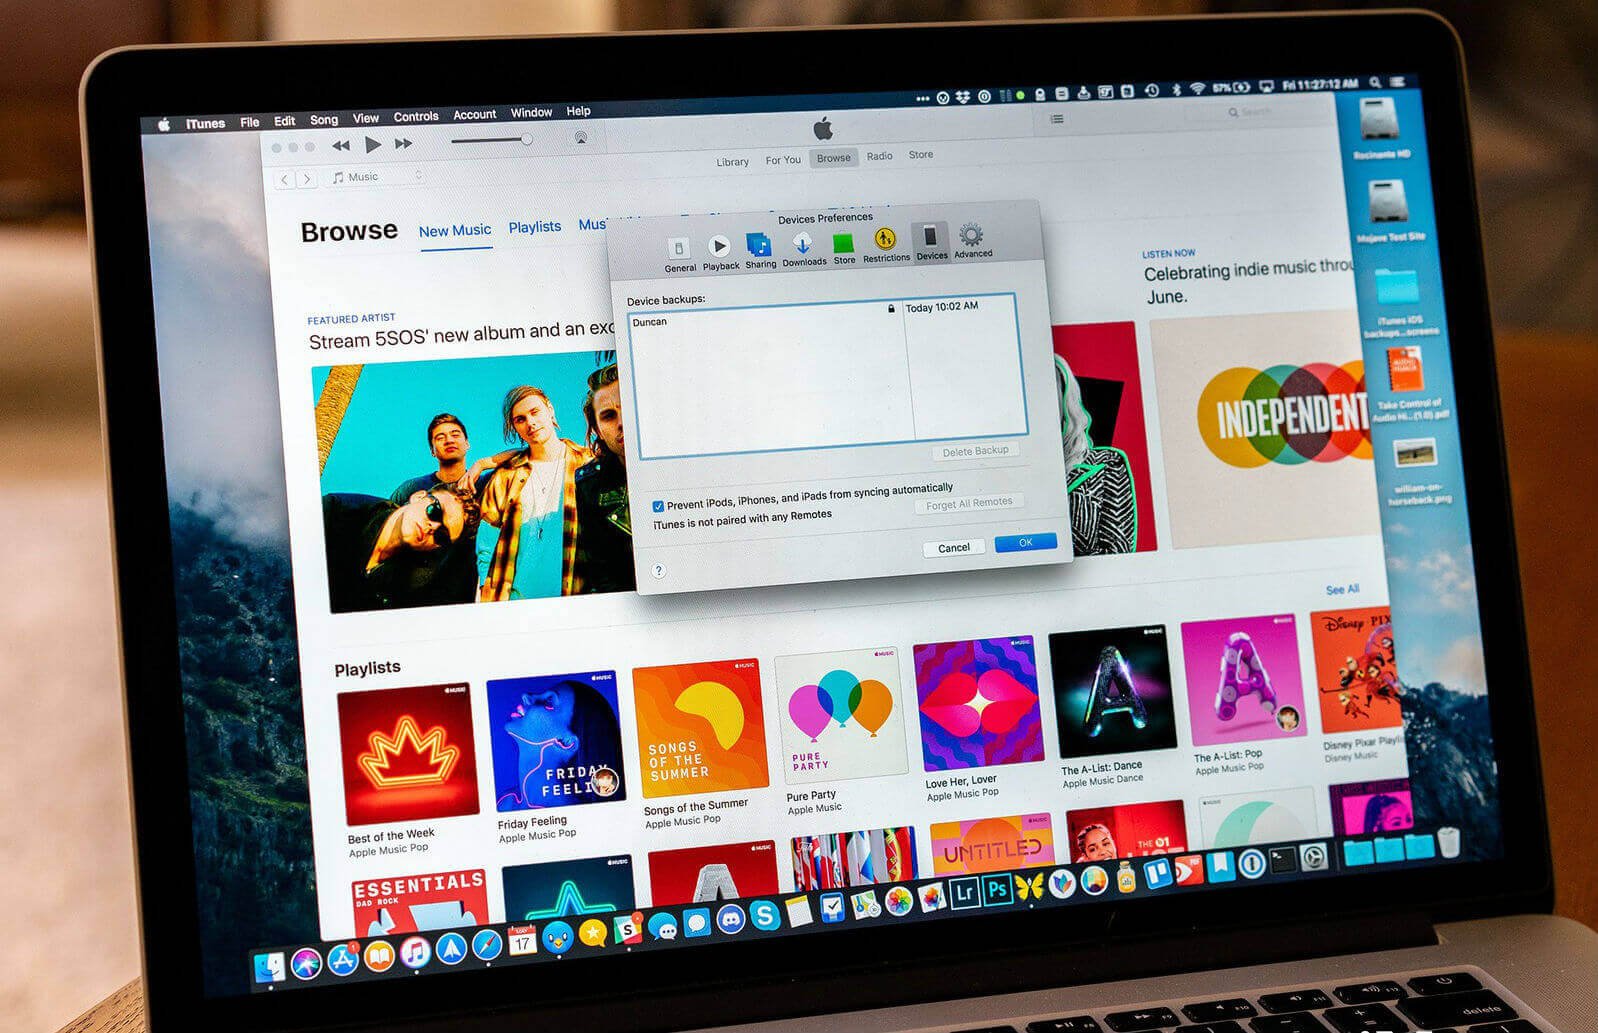
If you want to view backups of your iPhone/iPad/iPod on Mac, click to open the iTunes menu and navigate straight to iTunes > Preferences > Devices. And then you’d get a rundown of every one of the devices’ names that you’ve synced and backed up to the Mac, as well as the date when you did the last backup. However, if you have multiple iOS devices with the same name or maybe you’re not sure which backup you’re looking for and want to delete, simply drag your mouse or the cursor of your trackpad over the entries on your list. Once done, you’d get a small window display that’d be providing you info about the device which includes the phone numbers associated with it, serial numbers, and every other info that relates to the iOS device.

Once you have seen this, we’d diverge practically to OS X, where we’ll address how to delete backup files on macOS.
How to Locate and Delete iPhone Backups on Mac
If you want to check the size of your iPhone/iPad backup, simply control-click or right-click on the backup you’d want and then choose the “Show in Finder”. You’d get a Finder window that’ll show the backup files. Although it would be impossible for you to read the information in this folder without having a third-party tool, nevertheless you would be able to make use of the “Get-Info” command to understand the size of the backup. However, with a 256GB iPhone Xs, you’d have a backup size of above 50GB. On the off chance that you have lots of iOS devices with backups of the same size. In this way, you are able to see how it consumes the space on your Mac’s hard drive.

In order to delete a backup file, navigate back to the iTunes Preferences window, select any of the back-ups in the iDevices list, and click on the Delete Backup option. You’d be asked to confirm your choice from iTunes. Once done, click on the Delete button to actualize.
How to Delete iOS Software Update Files
On your home folder, navigate to the iOS update files at ~/Library/iTunes menu. However, there are different software updates for different devices. This is to say that different iDevices firmware files are kept at the Library/iTunes/iPad home Software Updates while looking for the same files for iPhone at the homepage for Library/iTunes/iPhone menu Software Updates.
How to Delete iTunes Junk on Mac in One Click
As you want to delete outdated iOS device backups, software updates, iOS broken downloads, and other supporting data in iTunes, we recommend you to try MacDeed Mac Cleaner, which is a powerful Cleaning application for Mac. It can delete all iTunes junk just in one click.
Step 1. Launch Mac Cleaner
Download Mac Cleaner and install it. Then launch it.
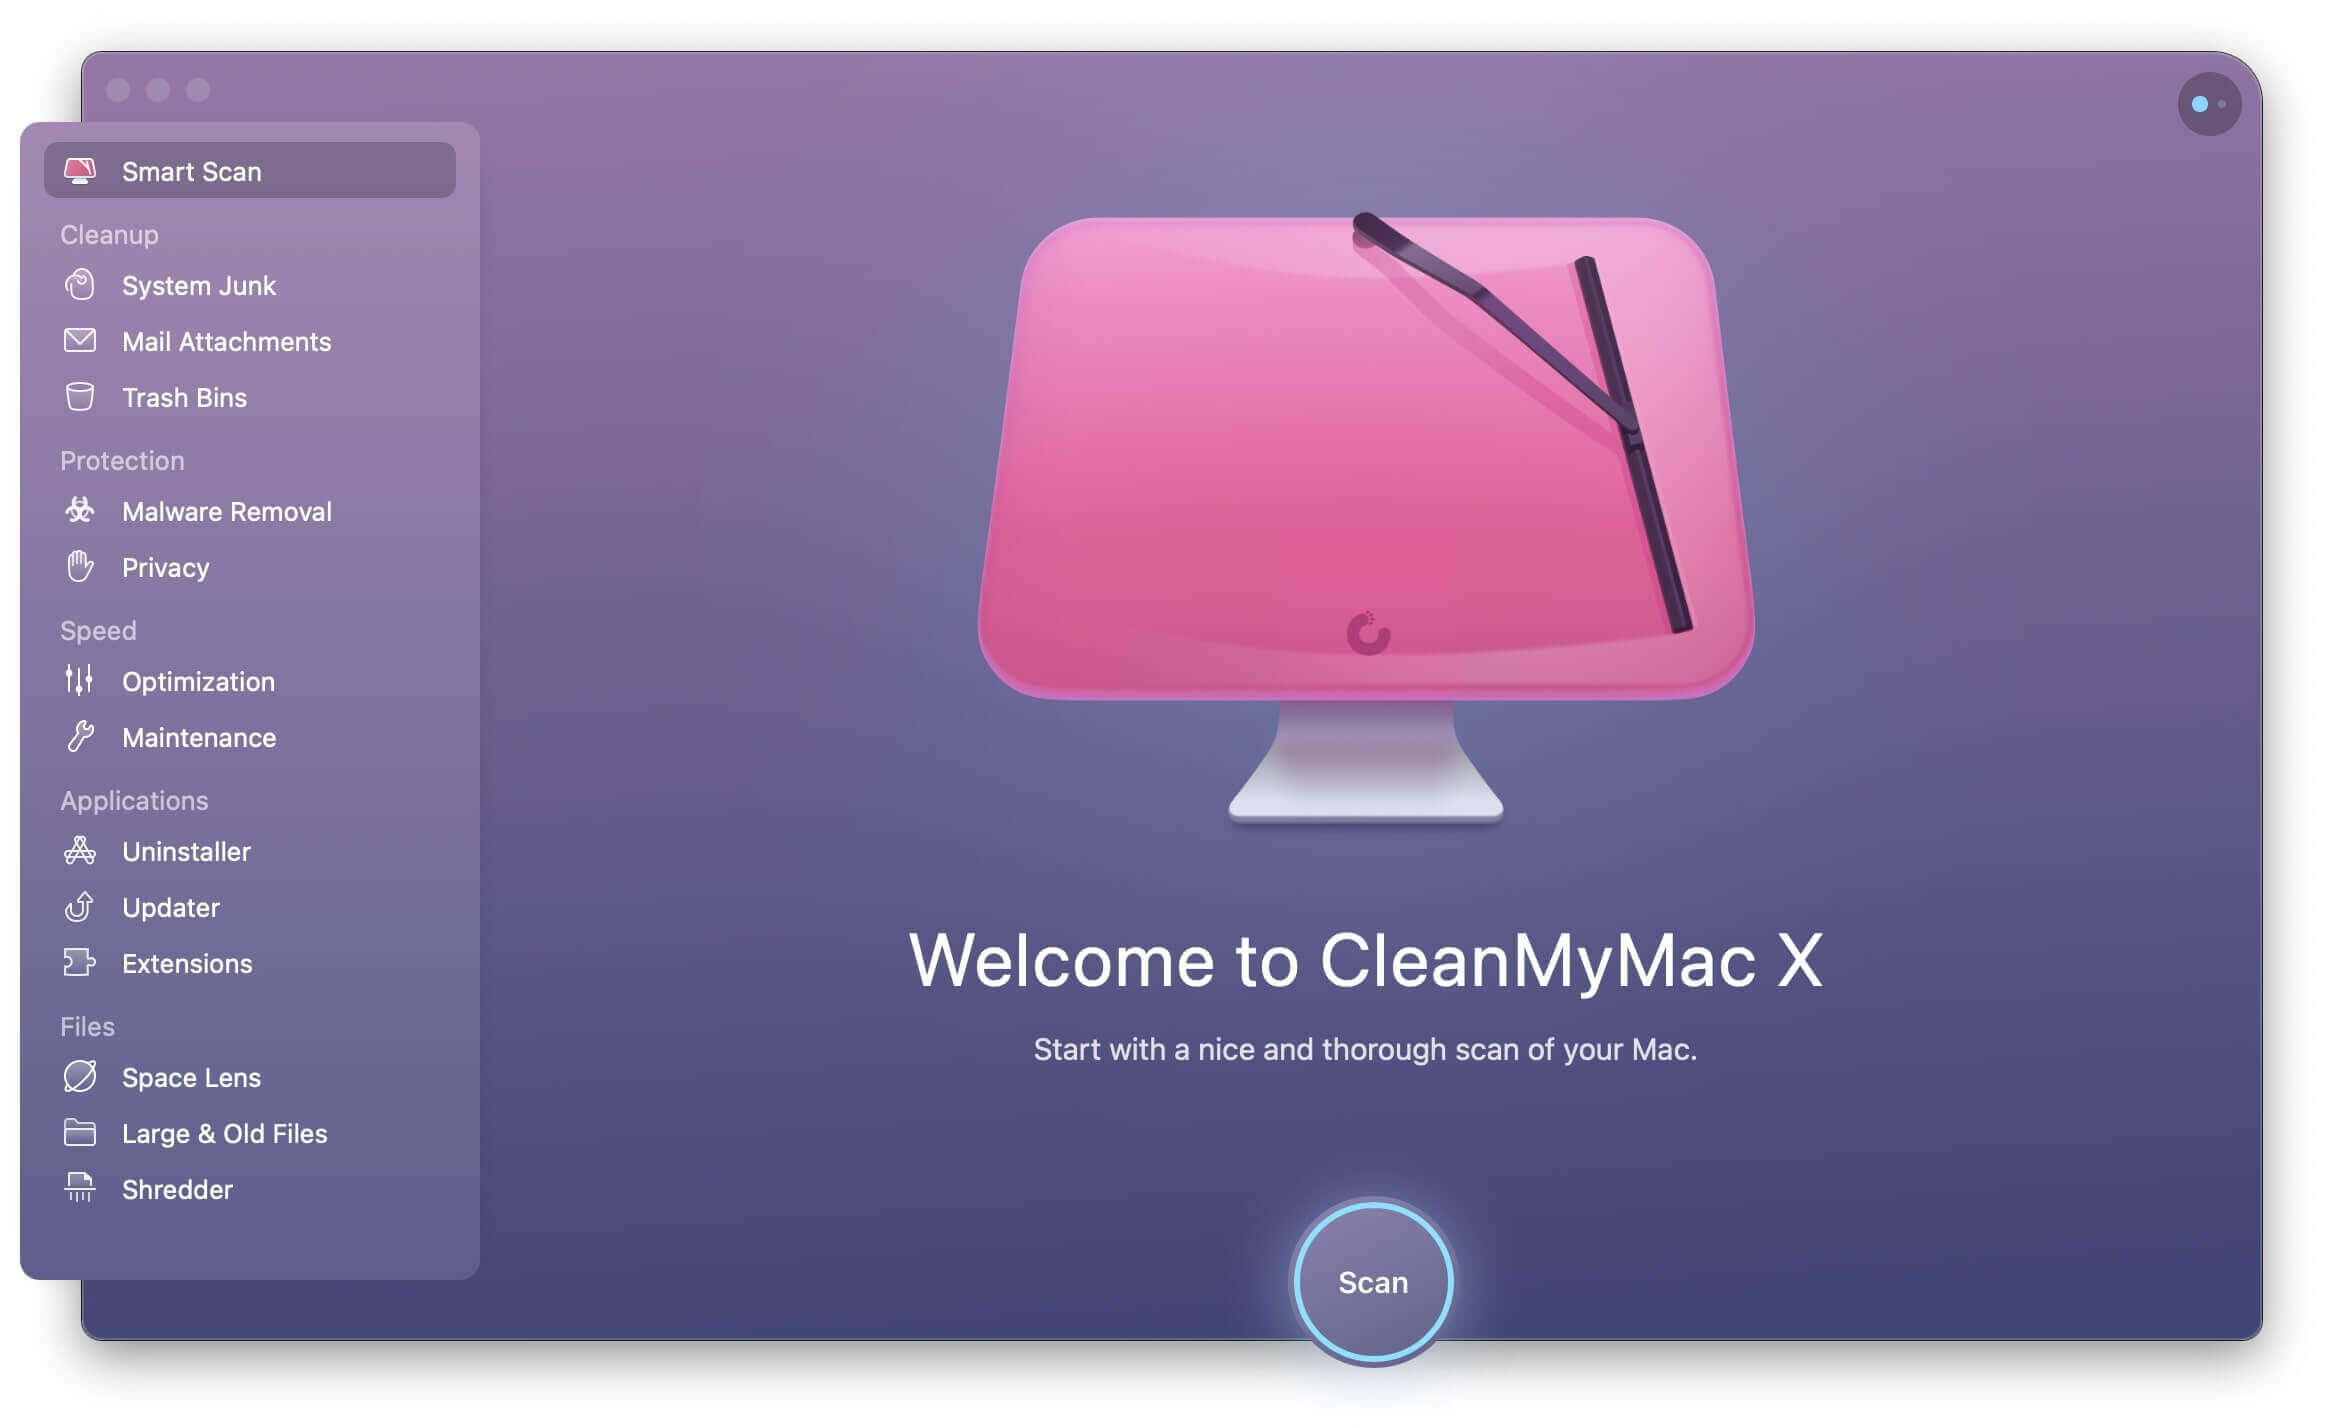
Step 2. Clean iTunes Junk
After launching Mac Cleaner, select “iTunes Junk” and click “Scan” to analyze your iTunes. Before cleaning iTunes junk, you can review the details to confirm what to delete.

How to Delete iPhone Backup on Windows PC
In the case whereby you find it difficult to delete an iPhone backup on your Mac, you can switch it on to the Windows platform and delete the backup from there. Simply delete it from its original folder, then close down and reopen it in the iTunes Preferences window. Once you’ve done this, you will no longer find the backup listed in the Device’s tab ever again.
Why You Might Want to Delete iPhone Backups on iCloud?
As aforementioned, iOS device backups consume quite a lot of space on your computer especially if you have multiple iOS devices synced on your PC or Mac.
A lot of clients never at any point look in the iTunes Preferences to monitor their backups and end up keeping old backups from devices they don’t have anymore. Further, new backups are made when a device is restored, so you may likewise accidentally have repetitive backups that are never again valuable.
By clearing these backups from iTunes, you can spare space and rearrange your backup list, which makes it simpler to know which backup to select when checking out or changing a device. You can likewise make use of close iTunes backups as an acquaintance to iCloud backups by performing regular backups to the cloud and saving total backups to your computer just every so often.
Regardless of which procedure seems ideal to you, it is very important to take note that erasing iPhone backups from iTunes isn’t the same as erasing a standard file on your computer. The backup isn’t set in Trash or the Recycle Bin and can’t be effectively recouped after it’s erased. Subsequently, be cautious as you deal with your iDevices backups, as you may coincidentally erase the main file of your iOS information in case of a lost or probably malfunctioning device.